Run Jenkins with Docker
In this guide, you'll secure an instance of Jenkins behind Pomerium Zero using single sign-on (SSO).
What is Jenkins?
Jenkins is an automation server you can use to build, test, and deploy applications.
Why use Pomerium with Jenkins?
You can set up role-based permissions in Jenkins to control a user's privileges with Jenkins' built-in authorization matrix. However, this method requires username/password authentication, which relies on Jenkins' user database to store credentials.
JWT authentication is a more secure method of identity verification that authenticates and authorizes users against an identity provider, eliminating the need to store or share credentials to access your Jenkins application.
Jenkins doesn't support JWT authentication out of the box. It requires a JWT authentication plugin to communicate with Pomerium. With the plugin installed, you can configure Pomerium to forward a user's JWT to Jenkins to achieve SSO.
Once you've configured JWT authentication, you can assign permissions within Jenkins for a specific user, any authenticated user, anonymous users, or a user group.
Before you start
To complete this guide, you need:
- A Pomerium Zero account
- Linux OS (this guide uses a Compute Engine VM running Debian 12)
- Jenkins (LTS release)
- Java (OpenJDK 17)
This guide runs Pomerium Zero and Jenkins in a Linux VM running Debian 12. If you're using Docker or Kubernetes, the steps will vary.
Set up Pomerium Zero
Build a policy for Jenkins
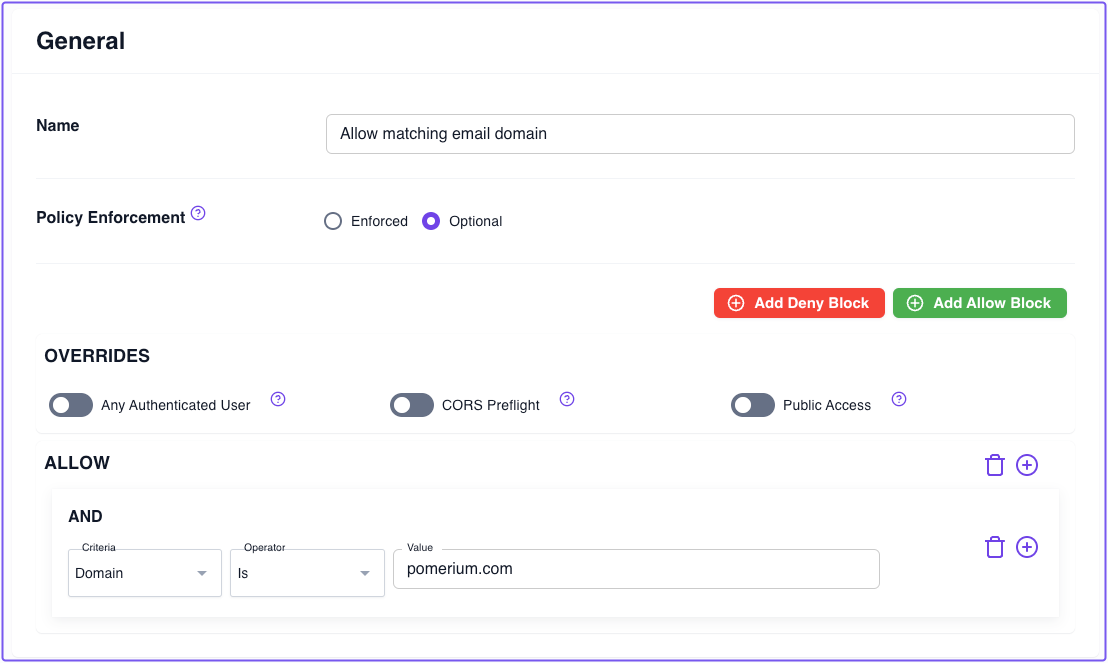
In the Zero Console, build a policy that grants access to a request only if the user's email address contains the specified domain:
- Select Policies, New Policy
- Name your policy (for example, "Allow matching email domain")
- Add an Allow block with an And operator
- Keep the Domain criterion and Is operator
- Enter the domain portion of the email address you'll use to access Jenkins (for example,
mycorp.com) - Save your policy

Build a route to Jenkins
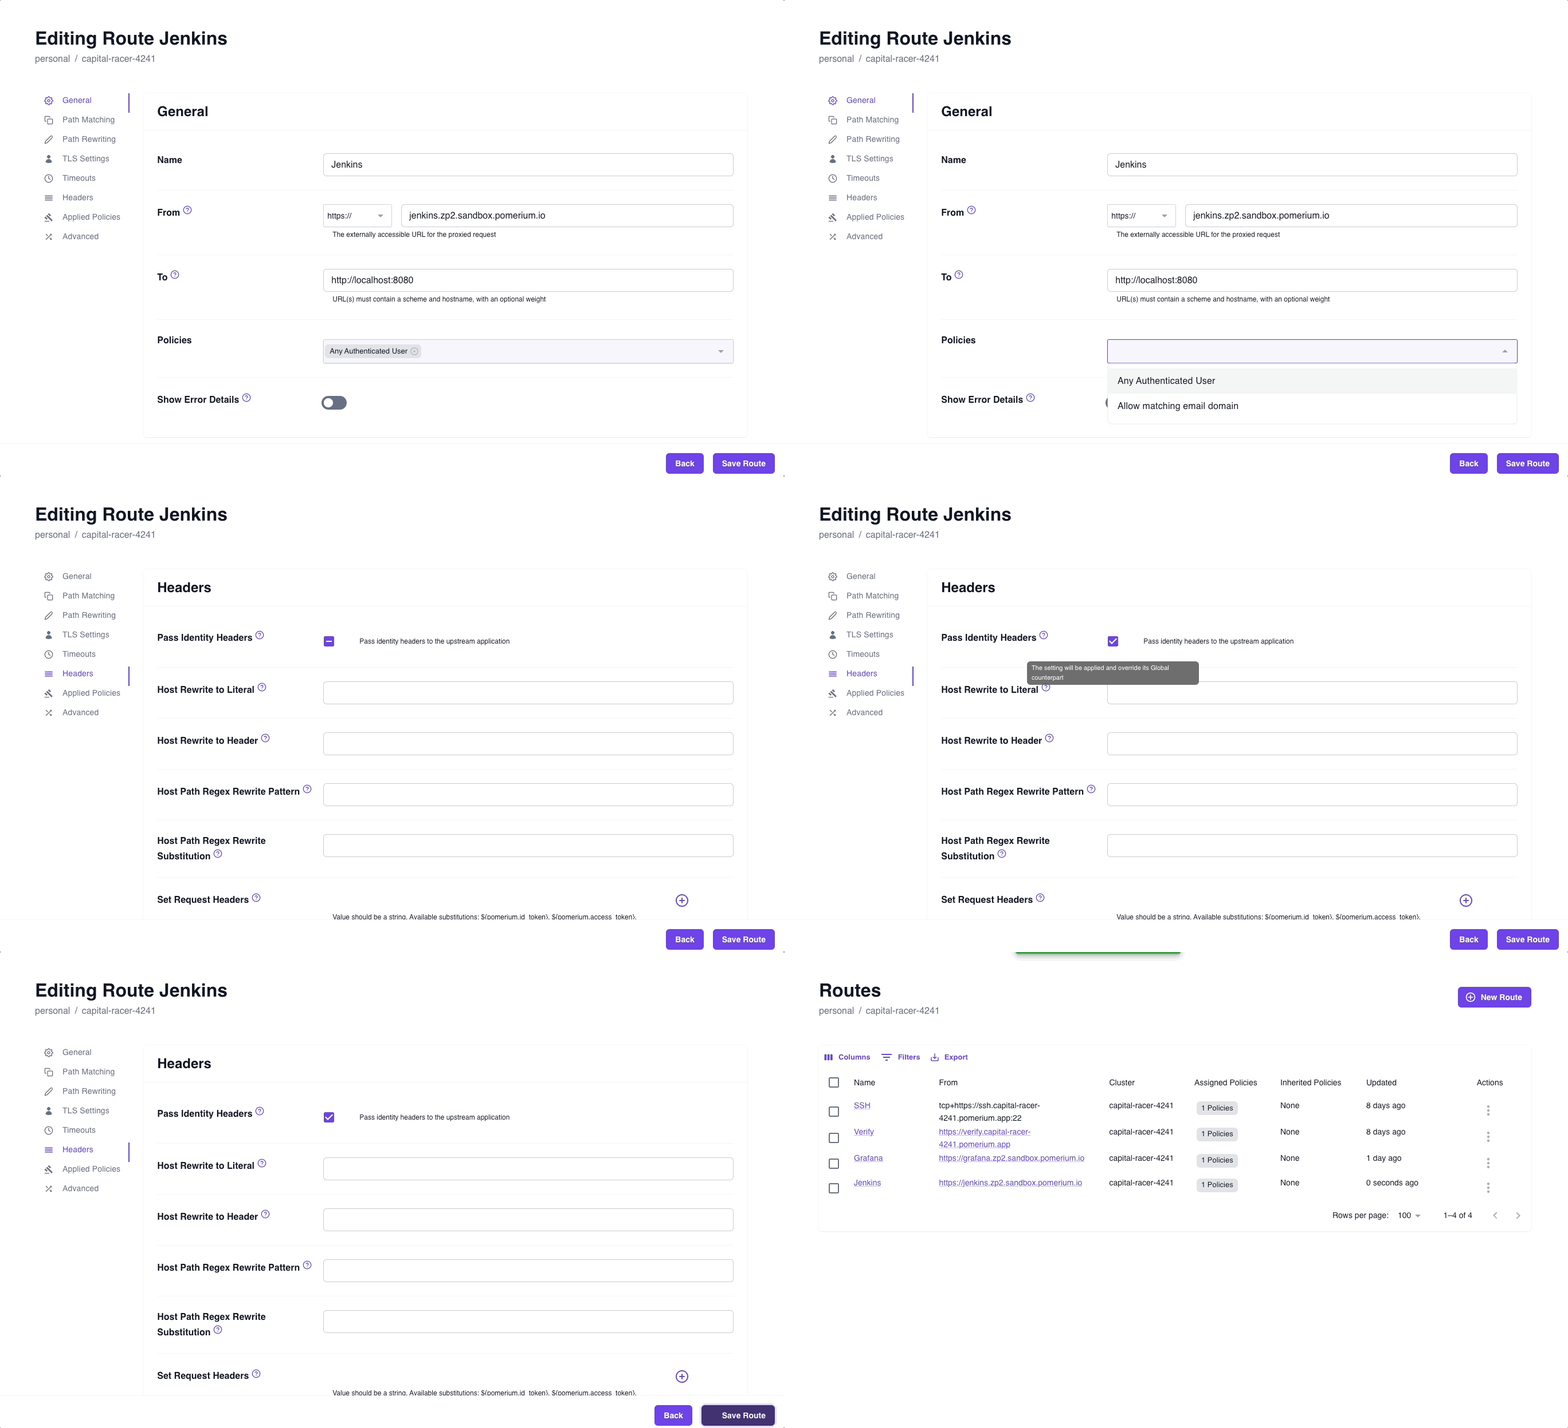
In the Zero Console:
- Select Routes, + New Route
- Name your route (for example, Jenkins)
- In the From field, select https:// and enter
jenkins.<CLUSTER_SUBDOMAIN>.pomerium.appas the URL - In the To field, enter
http://localhost:8080 - In the Policies field, select the policy you just saved
- Select the Headers tab and enable Pass Identity Headers
- Save your route
These steps assume you're using your cluster's Starter Domain to build a route to secure Jenkins. If you added a Custom Domain to your cluster, you can use that domain instead.

After you've saved your route and policy, apply your changes.
Access Jenkins
-
Access the external route you built to access Jenkins. After authenticating against Pomerium's hosted identity provider, you should be redirected to your Jenkins instance.
-
Before you can access your Jenkins dashboard, Jenkins will prompt you to enter the initial admin password. You can find it in
/var/lib/jenkins/secrets/initialAdminSecret.Run the following command to get the admin password:
$ sudo cat /var/lib/jenkins/secrets/initialAdminPassword -
Install the suggested plugins. Then, Skip and continue as admin (if you skip, the default username is admin and the password is the initial admin password). You'll reconfigure authentication for admin and non-admin users in the next section.
-
In the Instance Configuration window, accept the default hostname
Get JWT Auth plugin
In the Jenkins dashboard:
-
Select Manage Jenkins
-
Select Plugins
-
In the sidebar, select Available plugins
-
In the search bar, search for and install the JWT Auth Plugin
-
After installing, restart Jenkins:
sudo systemctl restart jenkins
Configure JWT authentication
After Jenkins restarts:
-
Access your Jenkins instance in the browser
-
Select Manage Jenkins
-
Select Security
-
In the Security Realm dropdown, select JWT Header Authentication Plugin
-
Under Global JWT Auth Settings, fill out the fields (reference the table below for the correct values)
Field Value Header name x-pomerium-jwt-assertionUsername claim name emailGroups claim name groupsGroups claim list separator ,Email claim name emailFull Name claim name nameAcceptable issuers jenkins.<YOUR_SUBDOMAIN>.pomerium.appAcceptable audiences jenkins.<YOUR_SUBDOMAIN>.pomerium.appJWKS JSON URL https://jenkins.<YOUR_SUBDOMAIN>.pomerium.app/.well-known/pomerium/jwks.json -
Enable Allow verification failures
-
Under Authorization, keep Anyone can do anything
- This ensures you can re-configure authentication settings in the event that JWT authentication fails, which will lock you out of your Jenkins instance.
Save your changes and restart Jenkins.
Authenticate with your JWT
Access your external Jenkins route. If you configured JWT authentication correctly, you'll notice you're logged in already.
Next, you need to configure authorization in Jenkins to set permissions.
Configure matrix-based authorization
-
Select Manage Jenkins, Security
-
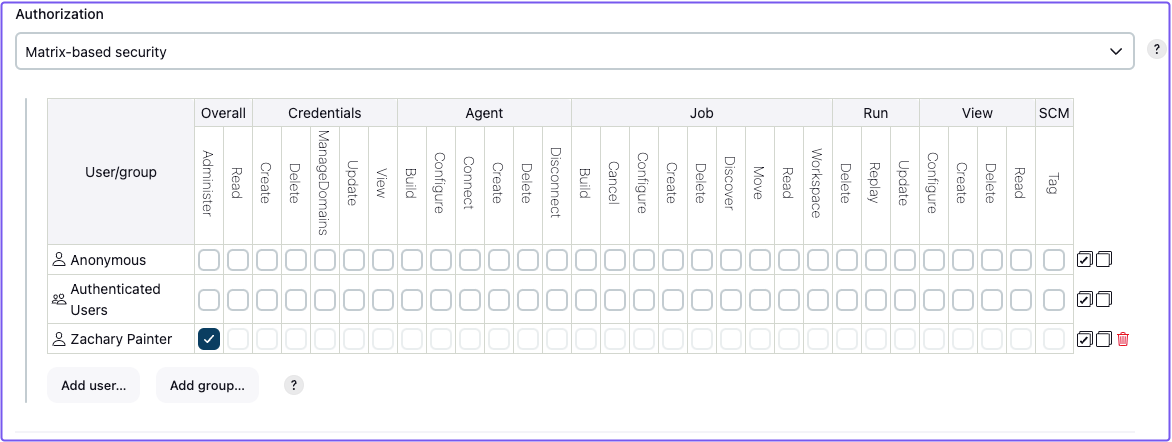
Under Authorization, select Matrix-based security
-
Select Add user...
-
In the modal, enter your User ID :::tip
To find your user ID, go to Dashboard, People. In the user table, you'll find the assigned ID value under the User ID column.
:::
-
Give the added user Administrator privileges

-
You can also give Anonymous users Overall Read privileges. This way, if someone accesses this Jenkins instance from another account, they won't be able to make changes to the application.
Save your changes. You're done!
Next steps
- If you access Jenkins using another email address, Jenkins will add that user to your Jenkins directory and assign them a user ID. You can add this user to the authorization matrix and assign them appropriate permissions.
- You can also add groups to the authorization matrix and assign permissions to them accordingly.